Psst.. wanna have fun with your Facebook Photo Album? Or you just want to jazz up your Facebook pic? Then you’ve come to the right place—I’ll show you how!
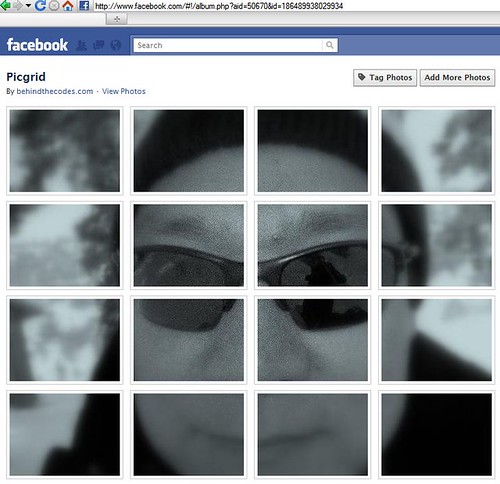
If you haven’t notice, your pictures in Facebook are organized in a grid structure. To be exact: they will be in a four-column grid. And just like the screenshot below (or the real thing here), you can see that it’s very easy to take advantage of this layout. The key is to know how to count. In pixels, that is!
Counting pixels
If you’re the curious type, I’ll show you how I count the pixels. If you’re the what-the-heck-just-give-me-the-money-honey type, then you can skip to the next section. Seriously, I won’t get mad—go ahead! ![]()
Alright, let’s get back to business.
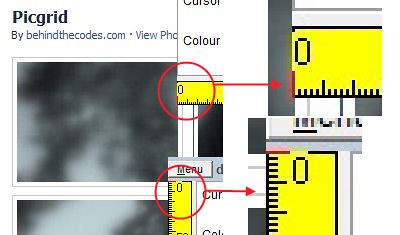
My tool of trade in working with websites is Firebug, a must-have Firefox add-on for web developers. With Firebug, I can easily see the size (width and height) of Facebook’s picture thumbnails. Simply right click on it, click ‘Inspect Element’, mouseover on the picture link, and voila! It’s 161px wide and 120px high, as clear as crystal. (NOTE: as of this writing, since Facebook puts the thumbnails as background image, then the size follows the container, ie. the I tag, which is set to 161px by 120px).

Now how about the gap between the thumbs? You can go with the Firebug route (that’s what I did), or you can use any screen ruler (my fave is the free dRuler here). Of course the screen ruler is easier, and you’ll clearly see that the horizontal gap is 20px, and the vertical gap is 18px.
So, if we have 4 columns (of 161px-wide thumbs) with 3 horizontal gaps (of 20px wide), then the maximum picture we can have is just a simple algebra: 4 * 161 + 3 * 20 = 704px. And since we can have as many rows as we want, the maximum height is—well, unlimited! (NOTE: again, as of this writing, looks like Facebook doesn’t limit the number of rows displayed in your picture album. Please correct me if I’m wrong :D).
With all these facts in our hand, we’re all set to create our own Facebook Grid Picture masterpiece!
From pic to gridpic
Let’s recap:
- Thumb size is 161px wide by 120px high.
- Gap between thumbs is 20px horizontally and 18px vertically.
- The maximum picture width we can slice and dice is (better be) 704px.
From here on, you can use any picture editing of your choice. Photoshop is very good, and even Microsoft Paint will could hopefully get the job done (by dragging you to the brink of your mental exhaustion along the way). Speaking of my fave tools, my choice for pic editing is Paint.NET. It’s no Photoshop of course, but it’s as powerful, yet free! And trust me: it’s no Microsoft Paint, in a big time good sense!
With these tools, you simply select a 161px by 120px area → crop/save it away somewhere save → move the selection 20px to the right or 18px down → and repeat. If you’re not that perfectionist, it’s OK to miss a pixel or two… nobody will notice, honest ![]()
It’s still too tedious of a job, you say? Don’t worry: behindthecodes.com to the rescue!
behindthecode.com’s fbgridpic tool
With a great pleasure, allow me to direct you to the tool I’ve built for this very purpose. No fancy flashy features here… pardon me for that. With this tool, all you need to do is simply submitting your pic, and the tool will output the grid thumb pics. You just need to save those pics to be uploaded later to your Facebook album. Simple, eh?
The way it works is just the same as doing it manually. With the help of PHP’s GD (image processing) functions, below is the code snippet:
// load pic
$pic = imagecreatefromjpeg($tmp_name);  // NOTE: $tmp_name stores the picture file name
$picwidth = imagesx($pic);
$picheight = imagesy($pic);

// calc grid/size
$colcount = ceil(($picwidth + GAPWIDTH) / (SLICEWIDTH + GAPWIDTH));
$rowcount = ceil(($picheight + GAPHEIGHT) / (SLICEHEIGHT + GAPHEIGHT));

// create grid pics
$gridpic = imagecreatetruecolor(SLICEWIDTH, SLICEHEIGHT);
$white = imagecolorallocate($gridpic, 255, 255, 255);
for ($row = 0, $y = 0; $y < $picheight; $row++, $y += SLICEHEIGHT + GAPHEIGHT) {
	for ($col = 0, $x = 0; $x < $picwidth; $col++, $x += SLICEWIDTH + GAPWIDTH) {
		imagefilledrectangle($gridpic, 0, 0, SLICEWIDTH, SLICEHEIGHT, $white);
		$w = $picwidth - $x;
		$h = $picheight - $y;
		imagecopy($gridpic, $pic, 0, 0, $x, $y,
							$w > SLICEWIDTH ? SLICEWIDTH : $w,
							$h > SLICEHEIGHT ? SLICEHEIGHT : $h);
		$gridname = "tmp/" . $basename . "_" . ($row + 1) . "_" . ($col + 1) . ".jpg";
		imagejpeg($gridpic, $gridname);
		echo '<img src="' . $gridname . '" />';
	}
	echo "<br />";
}

// done
imagedestroy($pic);
imagedestroy($gridpic);
Using a ‘thumb picture placeholder’ $gridpic, this code will copy areas of the input JPG picture based on the measurements we’ve made before. And in order to handle right and bottom edges properly, it will fill $gridpic with white color before copying, essentially to erase the previously copied picture area. Finally, for every area copy, the code will save it to a temporary folder, and display it on screen in an IMG tag. Nothing complicated, right?
Give me your inputs
I know this tool is just for fun. But hey, if you have any suggestion for enhancements, or if you find any bugs, let me know, will ya! TIA ![]()


I tried this in vain over and over again on my page: http://www.facebook.com/pages/Path-Breaking-Communications/176237245775926 I just can’t seem to get the order right :’( Please help!
Also, I tried uploading each of them individually too, but then it screwed the resizing again
If you’re talking about the pics in your album, you can actually drag-and-drop the pictures to rearrange them.
However unfortunately you can’t do the same on the pics displayed on the top of your profile page…