Related to the previous post on serving websites using a Windows 7 computer , my friend was asking if it’s possible to host PHP-based data-driven websites (using MySQL as the data storage) on his Windows 7 computer. Well, why not? Let’s talk about this a little bit….
PHP on IIS on Windows 7
First things first: We know that it’s easy to serve webpages on Windows 7 using the help of the IIS (Internet Information Services). You can serve static HTML files (as well as other files like JPG/GIF/PNG, CSS, JS, XML, etc.), and you can also serve dynamic files, ie. scripts—or programs—that run on the IIS/server side. And being Microsoft’s technologies, IIS has a built-in support for ASP and ASPX files, which are usually written in VBScript and a .NET scripting languages respectively. You just need to remember to install them when you’re installing your IIS, which is as simple as checking their checkboxes. In short: IIS as the web server and ASP/ASPX as the scripting language just works out of the box. They are a match made in heaven Microsoft’s labs.
Now PHP is a different story. To start with: PHP is not one of Microsoft’s technologies. PHP is generally/friendly/widely supported by open source communities, including Linux and Unix communities. But for Windows users, we usually need to install the PHP installer from the EXE package, edit some configuration files and environment variables, do some other manual tweaks and settings, pray that our operating system don’t get messed up along the way, and cross our fingers while testing if the installation is completed successfully. Some unfortunately users might take hours or even days just to redo this installation repeatedly until it works. Anyhow, you can Google on how to do this, and while you’re browsing you might encounter some horror stories on it.
Hold on. Please don’t get it wrong. Microsoft has embraced PHP and aiming to make it easy to install PHP on IIS. They have tools (Web Platform Installer) to make it easier to install PHP. They even provides a step-by-step walkthrough on the installation process. Sure you can follow this—which BTW you still need to do quite a bit of manual tinkering—but in my opinion: why not going down on an easier path?
Enter XAMPP
XAMPP (it’s Windows-based flavor here) is an all-in-one one-package-containing-all solution to serve your PHP counterpart. It’s running on Apache web server, and provides support for PHP and Perl scripting languages. It also throws in MySQL as a database system for your web apps, Mercury Mail to send emails, and FileZilla FTP server to upload (and download) your web files.
And how much easier is it to install this baby? Much—M U C H—easier than installing IIS + PHP + MySQL + the other components one by one, of course. Picture this: single-package installation containing all those componenent, and a click-and-go installer that does all the extracting and copying and setting up. Compared with IIS: oh well, you get the idea I hope :D.
Without further ado, allow me to demonstrate.
XAMPP installation
I fired up my browser and typed the address:
http://www.apachefriends.org/en/xampp-windows.html
Scrolling down to the Download section, I downloaded the installer (EXE) which at this current writing was at version 1.7.3 (2009/12/23). The basic package installer was only 51MB, which took me about 4 minutes with my T1 speed, and run it right afterwards.

The first step was to specify the destination folder. I kept the default folder C:\, because it will create a folder named xampp inside it.
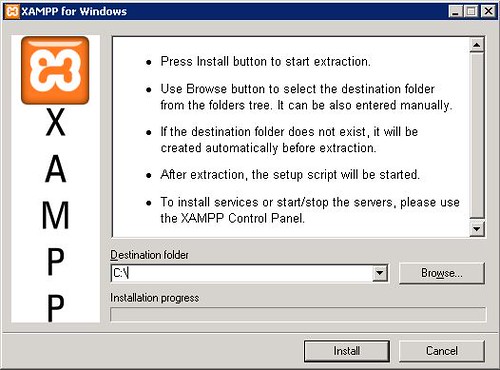
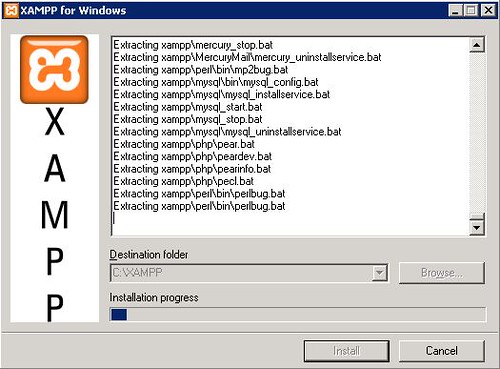
I hit the ‘Install’ button and watched the installer worked its magic as I sit back and relax.
Toward the end, it asked several questions in a Command Prompt window, which I happily follow through.
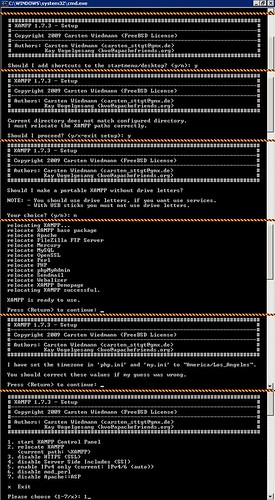
On the last step (which is kind of a ‘menu’), I chose 1 to start the XAMPP Control Panel. FYI you can actually x it out (exit) and launch the Control Panel via your Windows’ Start Menu.
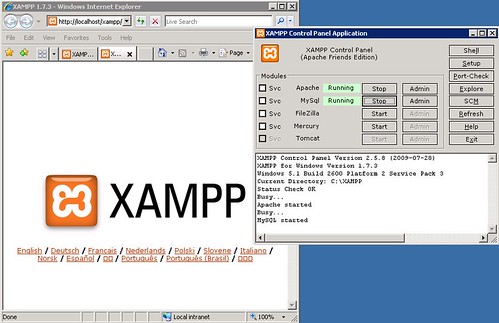
Anyway, on the Control Panel, I just hit the Start button on Apache module to start the web server. While I was there, I also started the MySQL service. After it started, I tested it out by going to this address on my browser:
http://localhost
The XAMPP splash page! That says I’m all set!
So let’s recap: the installation is just a matter of running the installer → hit Install → five Enters → 1 to start the Control Panel → and finally Start the Apache (as well as the related services you need, eg. MySQL). And the best part is that you don’t need to remember these: Just follow the directions and you’ll be all set! Now beat that with IIS!
Ummm.. I thought we’re talking about PHP?
Yes, don’t worry ![]() I don’t forget about it. We’re getting there. As a matter of fact, with Apache web server alive and kicking, we’re there already.
I don’t forget about it. We’re getting there. As a matter of fact, with Apache web server alive and kicking, we’re there already.
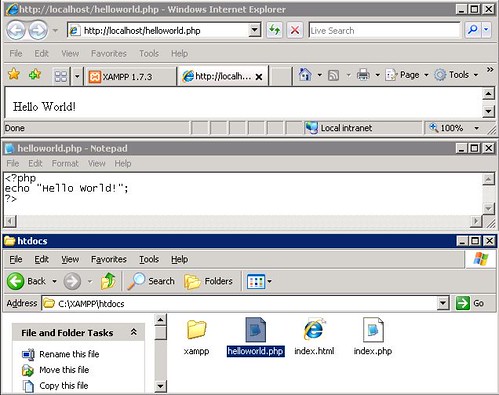
I’m sure you understand that the idea of a web server is just ‘serving’ web pages. For XAMPP, these web pages are served from xampp\htdocs folder in your installation folder—in my case, it’s in C:\xampp\htdocs. You just need to upload your PHP files there (or perhaps into a new subfolder in there).
For example, I put a helloworld.php in there:
<?php
echo "Hello World";
?>
… tested it:
http://www.apachefriends.org/en/xampp-windows.html
… and well, hello there!
So in conclusion: PHP works, just like that! And if you want to play more, your localhost—the XAMPP you just installed—has some demo programs (including one Perl program) you can try and study on.
XAMPP and portability
Before we proceed, let me clarify one thing: the idea of making XAMPP portable is more about carrying your ‘websites’ with you, rather than about making it install-once-run-anywhere. Yes, you can install XAMPP on your USB drive (thus making it portable), but what good is it without the website(s)? And if you have the website, isn’t it virtually accessible anywhere already (considering the address resolution and firewall/access rights are in place), thus making it ‘ever present’ with you? In other words, you’ll want to have a portable XAMPP only if:
- You’re building your website and your development can take place anywhere.
- You want an easy way to showcase your website, eg. to your client, investors, teammates, etc.
- You prefer having your data together with your website/web app.
- You can’t rely on the internet connectivity (or the government, while we’re at it :P).
So anyway, back to our walkthrough, making XAMPP portable is just a three-step work:
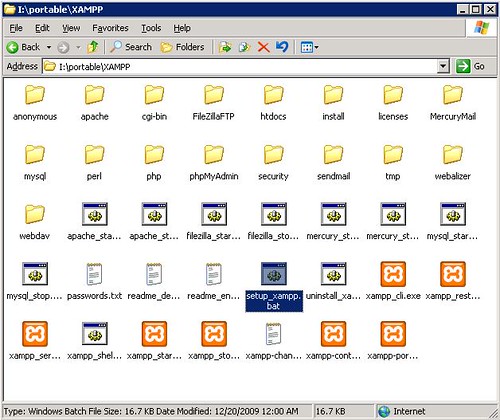
Step one: copy the XAMPP folder. Before you copy, you might need to stop the services first, because they might ‘lock’ the files, thus making the copy fails. On my installation, the entire XAMPP folder was about 250MB-something, so copying the it was fast and fit in my USB pen drive. After that, just transport it to your ‘target’—for me, it was plugging the USB drive into another PC. I didn’t bother to copy it into the target PC, since I want XAMPP to run off the USB drive directly.
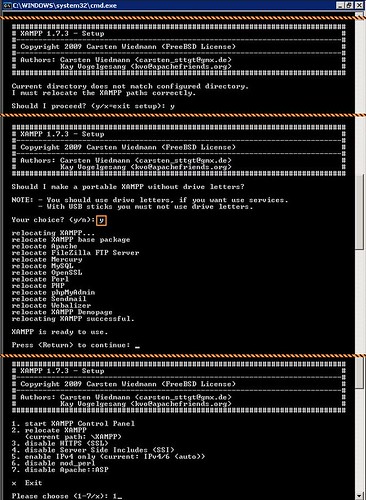
The second step is to relocate the XAMPP directory. This can be achieved by running the setup batch file, ie. setup_xampp.bat. The prompts are as easily understandable as the installation. And since I’m using a USB drive, as you can see from the screenshot, I need to tell the setup to make a portable XAMPP without drive letters.
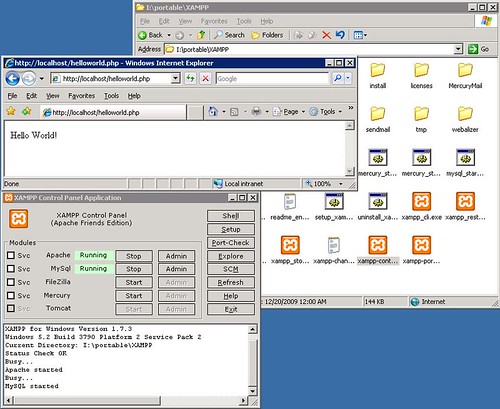
Lastly, run the control panel (via the setup’s text menu, or run xampp-control.exe to start Apache and MySQL/other services. After they’re running, test it (you’ll still use localhost) and off you go!
Afterwords
Now please pay attention here: XAMPP—and IIS on Windows 7—are meant for personal/development use only! Even though you can, but you won’t want to use it for any live/production-level websites. Don’t host your eCommerce sites with it! Don’t use them for your blog sites! Don’t even try! To make this point, allow me to cite this paragraph from their website:
There! It’s up to you now to heed my words or not—but as for me, I will never use XAMPP for my clients’ live websites :D.
Questions? Problems? Leave a comment and I’ll try my best to help.


Thanks for your guide! I have a question: hwo can I set XAMPP to listen to localhost only? Because I tried my LAN IP and it works, so other users in my LAN can also access my site, right?
@andy: correct, by default XAMPP will listen on port 80 on any IP available. To make it listen to localhost only, edit Apache’s configuration file (in your XAMPP’s installation folder, go to apachhe\conf, and open httpd.conf). The should be a line saying:
Listen 80
Change this to:
Listen localhost:80
After that, restart the Apache service so this change can take effect.
yes it works, thanks!